試験の準備方法-最高のC_S4CPB_2602出題内容試験-高品質なC_S4CPB_2602日本語版参考書
Wiki Article
Topexamは多くの受験生を助けて彼らにSAPのC_S4CPB_2602試験に合格させることができるのは我々専門的なチームがSAPのC_S4CPB_2602試験を研究して解答を詳しく分析しますから。試験が更新されているうちに、我々はSAPのC_S4CPB_2602試験の資料を更新し続けています。できるだけ100%の通過率を保証使用にしています。
我々社のSAP C_S4CPB_2602問題集を購入するかどうかと疑問があると、弊社TopexamのC_S4CPB_2602問題集のサンプルをしてみるのもいいことです。試用した後、我々のC_S4CPB_2602問題集はあなたを試験に順調に合格させると信じられます。なぜと言うのは、我々社の専門家は改革に応じて問題の更新と改善を続けていくのは出発点から勝つからです。
試験の準備方法-一番優秀なC_S4CPB_2602出題内容試験-認定するC_S4CPB_2602日本語版参考書
C_S4CPB_2602認定は、あなたの能力の最高の証明です。ただし、このようなC_S4CPB_2602試験を準備する自由時間が少ない作業担当者にとっては容易ではなく、人々は常に未知のものに対する恐怖を感じ、突然の変化に対処することはできません。ただし、C_S4CPB_2602試験問題はあなたのそばに立つことができます。そして、優れたC_S4CPB_2602学習教材を提供することに専念する決意です。 C_S4CPB_2602試験問題の無料デモをお試しください。詳細を理解して選択することができます。
SAP Certified - Implementation Consultant - SAP S/4HANA Cloud Public Edition (C_S4CPB_2602) 認定 C_S4CPB_2602 試験問題 (Q18-Q23):
質問 # 18
SIMULATION
Set up an Integration Scenario
Business Scenario
You are responsible for setting up the Bank Integration with File Interface (1EG). During an actual implementation, you would first download the Set-up Instructions for the business process from SAP Signavio Process Navigator. In this practical exam, all the information will be provided to you, so you do not need to download the Set-up Instructions.
Prerequisites
Note:
In the task below, always replace ###### with the last 6 digits of your group number.
Note:
Make sure to use the EXACT names/values/spaces as they are listed in the task. Even forgetting a space or a number will cause the validation of the task to fail and be marked as incorrect.
Your Task
Create a Communication User with the information listed below and save.
正解:
解説:
See Explanation below for all solution
Explanation:
Objective
The purpose of this task is to create a new Communication User for the integration scenario Bank Integration with File Interface (1EG).
This communication user will later be used in the integration setup, especially when defining the communication system and communication arrangement.
Business Scenario Explanation
In this scenario, you are setting up the integration for:
Bank Integration with File Interface (1EG)
In SAP S/4HANA Cloud, technical communication between systems is usually handled through:
a Communication User
a Communication System
a Communication Arrangement
This task is the first step in that chain.
The communication user acts as the technical user that the system uses for integration-related authentication.
Important Notes
Always replace ###### with the last 6 digits of your group number.
Use the exact values shown in the task.
Do not change spaces, underscores, or capitalization.
The password should not be typed manually if the task says:
Have the system propose a password
Required Values
Use the following values exactly as shown in the task image.
Example
If your suffix is 000013, then the values become:
User Name = 1EG_COMM_USER_000013
Description = 1EG Communication User
Step 1: Open the app "Communication Users"
From the SAP S/4HANA Cloud launchpad:
Log in to SAP S/4HANA Cloud.
Use the search bar or app finder.
Search for:
Communication Users
or
Maintain Communication Users
Open the app.
Explanation:
This app is used to create and maintain technical communication users for integration scenarios.
This is the correct starting point because the task explicitly says to create a Communication User.
Step 2: Start creating a new communication user
Inside the Communication Users app:
Click:
New
Explanation:
This starts the creation of a new communication user record.
Step 3: Enter the User Name
In the new communication user screen, enter:
User Name = 1EG_COMM_USER_######
Example
If your suffix is 000013, enter:
1EG_COMM_USER_000013
Explanation:
This is the technical identifier for the communication user.
It must match the task exactly.
Step 4: Enter the Description
In the Description field, enter exactly:
1EG Communication User
Explanation:
This is the functional description of the technical integration user.
It should be entered exactly as written in the task to avoid validation issues.
Step 5: Let the system propose the password
In the password section:
Do not manually type a password.
Click:
Propose Password
Explanation:
The task explicitly says:
Password = Have the system propose a password
So the correct action is to use the SAP-generated password instead of entering your own value manually.
Step 6: Review the generated password
After clicking Propose Password:
The system generates a password automatically.
If the system displays the password, note it down if needed for later integration steps.
Explanation:
In some cases, the proposed password may later be needed during communication setup or documentation.
Even if not needed later in the simulation, this confirms the correct procedure was followed.
Step 7: Save the Communication User
Click:
Save
Explanation:
This finalizes the creation of the communication user.
Without saving, the technical user will not exist and the later integration steps will fail.
Step 8: Verify the Communication User
After saving, confirm that the communication user exists in the list and displays the correct values:
User Name = 1EG_COMM_USER_######
Description = 1EG Communication User
Explanation:
This confirms the task is complete and the user is ready to be used in the next integration setup tasks.
Expected Result
After this task is completed successfully:
the communication user exists,
the user name matches the required naming convention,
the description is correct,
the password was proposed by the system,
the user is saved successfully.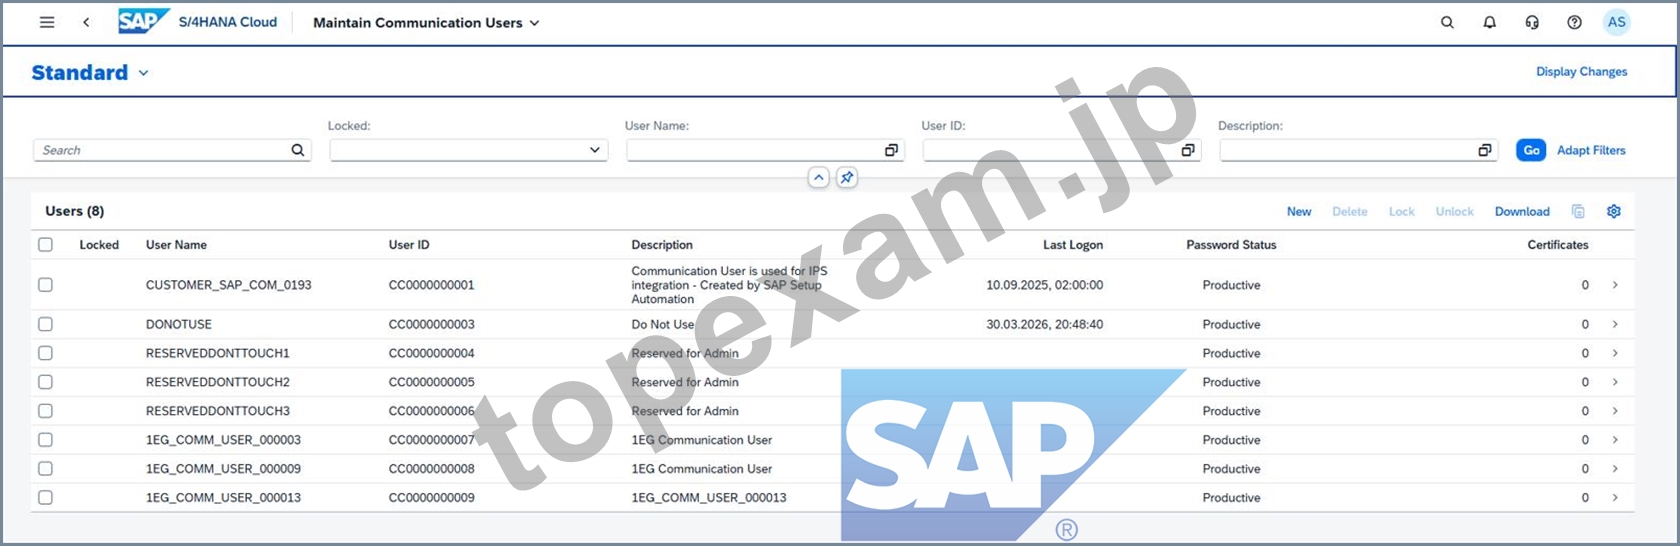
質問 # 19
SIMULATION
Create a Custom Business Role with Restrictions
Business Scenario:
You are building a custom business role with restrictions to ensure the end users assigned the role have only the minimum level of access necessary to complete their core job tasks. The end users are project managers based in the United States. They should only be able to create projects, edit projects, and access projects that are occurring in the United States. They should not be able to staff any resources outside of the United States. Write, Read, and Value Help access should be restricted to only the United States for all relevant fields.
Prerequisites:
Note: In the task below, always replace ###### with the last 6 digits of your group number.
Note: Make sure to use the EXACT names/values/spaces as they are listed in the task. Even forgetting a space or a number will cause the validation of the task to fail and be marked as incorrect.
Task:
Use the template for the business role Project Manager - Professional Services (SAP_BR_PROJECT_MANAGER_PROF) to create a new business role with the following information:
正解:
解説:
See Explanation below for all solution
Explanation:
Objective
The purpose of this task is to create a custom business role for project managers in the United States by using the standard SAP template role Project Manager - Professional Services and then restricting the role so users only have the minimum access needed for their job.
The template role used is:
Template Business Role ID: SAP_BR_PROJECT_MANAGER_PROF
Template Business Role Description: Project Manager - Professional Services The new custom role must be created with exact values defined in the task.
Business Scenario Explanation
In this simulation, you are building a restricted custom role for project managers who work only in the United States.
The goal is to ensure that these end users:
can create and edit projects,
can access only projects occurring in the United States,
cannot work with projects or staffing outside the US,
have only the minimum level of authorization needed.
This is done in two major parts:
Create a new custom business role from the standard SAP template
Restrict the role values so only US-related data is allowed
Important Notes
Always replace ###### with the last 6 digits of your group number.
Every value must be entered exactly as shown.
Even one missing space or incorrect character can cause the simulation validation to fail.
You must also create and assign a launchpad space as part of the custom role creation.
Required Values for Role Creation
Use the following values exactly as shown in the task image.
Parameter
Value
New Business Role ID
BR_PROJECT_MANAGER_PROF_US_######
New Business Role Description
Project Manager - Professional Services - US - ######
Option for Launchpad Spaces
Create and Assign Spaces Based on Space Templates
New Space ID
ZBR_PROJECT_MANAGER_PROF_US_######
Activate IAM Apps
Yes (check the box)
Example
If your suffix is 000457, the values become:
BR_PROJECT_MANAGER_PROF_US_000457
Project Manager - Professional Services - US - 000457
ZBR_PROJECT_MANAGER_PROF_US_000457
Detailed Step-by-Step Procedure
Part 1: Open the standard template role
Step 1: Open the app "Maintain Business Roles"
From the SAP S/4HANA Cloud launchpad:
Log in to SAP S/4HANA Cloud.
Use the app search.
Search for:
Maintain Business Roles
Open the app.
Explanation:
This app is used to maintain standard and custom business roles.
Because this task requires creating a custom role from an existing template, this is the correct starting app.
Step 2: Search for the template role
Inside Maintain Business Roles:
In the search/filter area, search for:
SAP_BR_PROJECT_MANAGER_PROF
or
Project Manager - Professional Services
Open the standard SAP template role.
Explanation:
You must start from the standard template role because the task explicitly says to use the template for:
Project Manager - Professional Services
SAP_BR_PROJECT_MANAGER_PROF
Part 2: Create the custom role from the template
Step 3: Click "Create Derived Business Role"
On the template role page:
Click:
Create Derived Business Role
Explanation:
This function creates a customer-specific copy based on the standard SAP business role template.
It preserves the delivered role content but allows you to define your own role ID, description, restrictions, and launchpad space.
Step 4: Enter the custom role information
In the creation popup, enter the values exactly as follows:
Template = SAP_BR_PROJECT_MANAGER_PROF
New Business Role ID = BR_PROJECT_MANAGER_PROF_US_######
New Business Role Description = Project Manager - Professional Services - US - ###### Option for Launchpad Spaces = Create and Assign Spaces Based on Space Templates New Space ID = ZBR_PROJECT_MANAGER_PROF_US_###### Activate IAM Apps = checked Explanation:
These values define the new custom project manager role that will later be restricted to US-only access.
The space option is important because the task expects the role to include its own launchpad space.
Step 5: Confirm creation
Click OK
Explanation:
SAP now creates the custom role derived from the template and assigns the new launchpad space at the same time.
Part 3: Verify the newly created custom role
Step 6: Review the new custom role
After creation, SAP opens the new custom role.
Verify:
Business Role ID = BR_PROJECT_MANAGER_PROF_US_######
Business Role Description = Project Manager - Professional Services - US - ###### Business Role Template ID = SAP_BR_PROJECT_MANAGER_PROF Explanation:
This confirms the derived role was created correctly from the right SAP template.
Part 4: Maintain role restrictions
Step 7: Open "Maintain Restrictions"
On the custom role page:
Click:
Maintain Restrictions
Explanation:
This is the most important part of the task.
You are not only creating a role - you are also limiting the role so it only allows US-related values.
Step 8: Understand the rule for restriction maintenance
The PDF/task logic is:
Fields explicitly listed in the restriction table → keep them Restricted and enter the required values All other fields not listed in the task table → set them to Not Maintained Explanation:
This is essential.
If extra fields remain restricted or blank, the role may not validate correctly.
The safest approach is:
only maintain the required fields,
mark all unrelated fields as Not Maintained.
Part 5: Enter the required US restrictions
From your exercise run, the maintained values included restrictions such as:
Keep these kinds of fields restricted with US/1710 values where required Examples from your run:
Bank Country/Region Key
Read, Value Help = US
Value Help = US
Company Code
use 1710 only where the task table explicitly requires it
Purchasing Organization
use 1710 where required
Valuation Area
use 1710 where required
Explanation:
These are the exact business restrictions that make the role usable only for the intended geography and business scope.
Step 9: Set unrelated restriction fields to "Not Maintained"
For every field not included in the task's restriction list, choose:
Not Maintained
Examples from your screenshots included fields like:
Accounting Principle
Authorization Group for Business Partners
Billing Type
These should be Not Maintained unless they are explicitly listed in the task's required restriction table.
Explanation:
This removes unnecessary access and matches the task wording that all other fields should be set to Not Maintained.
Step 10: Save the restrictions
After all required values are entered and unrelated fields are marked Not Maintained:
Click Save
Explanation:
This saves the restriction profile of the role.
If you do not save here, the role will remain incomplete or in draft.
Part 6: Verify launchpad space and page creation
Step 11: Go to Launchpad Spaces
In the custom role:
Open the tab:
Launchpad Spaces
Verify that the assigned space exists:
ZBR_PROJECT_MANAGER_PROF_US_######
Explanation:
Because you selected Create and Assign Spaces Based on Space Templates, SAP should have created and assigned the launchpad space automatically.
Step 12: Verify the created space
Open the assigned space and confirm:
the custom space exists,
it is customer-managed,
the pages are assigned correctly.
Explanation:
This proves that the new business role has its own launchpad structure as required by the task.
Expected Result
After this task is completed successfully:
a new custom role exists based on SAP_BR_PROJECT_MANAGER_PROF,
the role uses the exact required ID and description,
the role has a custom launchpad space,
IAM apps are activated,
restrictions are maintained for US-only access,
all irrelevant fields are set to Not Maintained,
the role is saved successfully.
質問 # 20
SIMULATION
Create a Custom Launchpad Space and Page
Business Scenario
You are building a custom business role that will be assigned to all employees in the organization. The business role and its corresponding Launchpad Space and Page need to include the apps that have been granted through the business catalogs assigned to the business role to ensure employees have an easy time finding the relevant applications.
Note: In the task below, always replace ###### with the last 6 digits of your group number.
Note:
Make sure to use the EXACT names/values/spaces as they are listed in the task.
Even forgetting a space or a number will cause the validation of the task to fail and be marked as incorrect.
Task:
Assign the business role to your user and save. Then refresh the browser and navigate home to verify the new Launchpad Space and tiles are visible.
正解:
解説:
See Explanation below for all solution
Explanation:
Objective
The purpose of this task is to assign the newly created custom all-employee business role to your own business user, save the assignment, refresh the browser, and then verify that the new Launchpad Space and its tiles are visible on the homepage.
This is the final verification step for the all-employee role and launchpad setup.
Business Scenario Explanation
In the previous tasks, you created and configured:
a new custom business role for all employees,
the required business catalogs,
a custom launchpad space,
a custom launchpad page,
and the employee self-service tiles:
Manage My Timesheet
Concur Travel Expense
However, even if all of that is configured correctly, you still will not see the new page and tiles on your homepage until the custom role is assigned to your own business user.
This task connects the configuration to your user and verifies the final end-user result.
Important Notes
Always replace ###### with the last 6 digits of your group number.
Use the exact business role ID.
Save the user after adding the role.
Refresh the browser after saving.
Then navigate back to Home and confirm the space/page/tiles are visible.
Required Business Role
Assign the custom all-employee role created earlier:
Business Role ID: Z_EMPLOYEES_ALL_######
Business Role Description: All Employee Role ######
Example
If your suffix is 000013, the role is:
Z_EMPLOYEES_ALL_000013
Detailed Step-by-Step Procedure
Step 1: Open the app "Maintain Business Users"
From the SAP S/4HANA Cloud launchpad:
Log in to SAP S/4HANA Cloud.
Search for:
Maintain Business Users
Open the app.
Explanation:
This app is used to assign business roles to users.
The launchpad space and tiles will only become visible after the custom role is assigned to your own user.
Step 2: Search for your own business user
In Maintain Business Users:
Enter your own user name or business user ID in the search field.
Click Go.
Explanation:
You must assign the role to your own user because you are the one who will verify the launchpad result on the homepage.
Step 3: Open your user record
From the search results:
Click your user entry.
Open the user details page.
Explanation:
This opens the maintenance page where assigned business roles can be reviewed and changed.
Step 4: Switch to Edit mode
On the business user page:
Click Edit
Explanation:
Without edit mode, the role assignment list is display-only.
Step 5: Open the "Assigned Business Roles" tab
Inside the user record:
Click:
Assigned Business Roles
Explanation:
This tab contains the list of all business roles currently assigned to your user and is the correct place to add the all-employee role.
Step 6: Click Add
In the Assigned Business Roles section:
Click Add
This opens the popup:
Add Business Roles
Explanation:
This popup allows you to search for and assign the custom all-employee role.
Step 7: Search for the custom all-employee role
In the Add Business Roles popup:
In the business role search field, enter:
Z_EMPLOYEES_ALL_######
Click Go
Select the role:
Z_EMPLOYEES_ALL_######
All Employee Role ######
Example
If your suffix is 000013, search for:
Z_EMPLOYEES_ALL_000013
Explanation:
This is the custom role created in the earlier launchpad/employee-role tasks.
It contains the launchpad space, catalogs, and page content that must now become visible to your user.
Step 8: Add the role
After selecting the role:
Click OK or Apply
Explanation:
This adds the role to your user in draft mode.
Step 9: Save the business user
Back on the business user page:
Click Save
Explanation:
This is a mandatory step.
Without saving, the role assignment is not finalized, and the new launchpad content will not appear for your user.
Step 10: Confirm the role assignment
After saving, verify that your assigned roles list includes:
Z_EMPLOYEES_ALL_######
All Employee Role ######
Explanation:
This confirms that the role is now officially assigned to your user.
Step 11: Refresh the browser
After saving:
Refresh the browser completely
Explanation:
SAP launchpad content is often cached in the current session.
A browser refresh ensures the newly assigned role content is loaded.
Step 12: Navigate back to Home
After refreshing:
Return to Home
Explanation:
The role's launchpad space and page must be verified from the end-user homepage, not only from configuration apps.
Step 13: Open the page / launchpad tab
On the homepage, look for the custom page/tab that contains the employee content.
In your run, the visible page was:
General
Explanation:
The launchpad page created earlier was titled General, so that is the page you should open to verify the result.
Step 14: Verify the section title
On the page, confirm that you can see the section:
Self-Services
Explanation:
This was the section title created in the earlier page-content maintenance task.
Step 15: Verify the tiles
Under the Self-Services section, confirm that both tiles are visible:
Concur Travel Expense
Manage My Timesheet
Explanation:
These are the two required employee self-service tiles added to the page in the previous task.
Seeing both of them confirms that:
the catalogs were assigned correctly,
the launchpad page was maintained correctly,
the business role was assigned correctly,
and the browser refresh loaded the new content successfully.
Expected Result
After completing this task successfully:
your own user has the custom business role assigned,
the role is saved successfully,
after browser refresh the launchpad updates,
the homepage shows the new launchpad page,
the Self-Services section is visible,
and the tiles Concur Travel Expense and Manage My Timesheet are visible.
質問 # 21
SIMULATION
Note: In this practical certification exam, you will only be given high-level instructions. The step descriptions are complete and tested to work. They are not detailed, as this is a test of your knowledge of navigating the system on your own.
Caution: Please make sure you are always using your assigned group number. The last 6 digits are denoted as ###### in the following tasks. Your results will not be recorded if you are not using your own group number. To find your group number: Select your user in the top right corner. You will see your user name with a series of numbers. Use the last 6 digits as your group number Caution: To keep the system running smoothly and avoid unnecessary costs, please follow the assigned exercises carefully when using the SAP Landscape. Avoid going beyond the exercise scope and only use your group number to help maintain a stable and efficient environment for everyone.
正解:
解説:
See Explanation below for all solution
Explanation:
Purpose: Identify your own six-digit suffix and use it consistently in every task.
Open the user menu at the top-right of SAP S/4HANA Cloud.
Read your user name and note the last six digits.
Use those last six digits in every place the task PDF shows ######.
Example used in this guide: 000013
質問 # 22
SIMULATION
Create a Custom Launchpad Space and Page
Business Scenario
You are building a custom business role that will be assigned to all employees in the organization. The business role and its corresponding Launchpad Space and Page need to include the apps that have been granted through the business catalogs assigned to the business role to ensure employees have an easy time finding the relevant applications.
Note: In the task below, always replace ###### with the last 6 digits of your group number.
Note:
Make sure to use the EXACT names/values/spaces as they are listed in the task.
Even forgetting a space or a number will cause the validation of the task to fail and be marked as incorrect.
Task:
Assign the Launchpad Space to your custom business role. Edit the Launchpad Page to add the applications listed below as tiles (standard "preferred" square tile) with the Section Title: Self-Services.
Manage My Timesheet
Concur Travel Expense
正解:
解説:
See Explanation below for all solution
Explanation:
Objective
The purpose of this task is to complete the launchpad setup for the custom all-employee role by:
assigning the custom Launchpad Space to the business role,
editing the Launchpad Page,
creating a section titled Self-Services,
adding the required applications as standard preferred square tiles:
Manage My Timesheet
Concur Travel Expense
Business Scenario Explanation
In the earlier tasks, you created:
a custom all-employee business role,
the required business catalog assignments,
a custom launchpad space and page.
This task completes that setup by adding the actual application tiles that end users will see on the launchpad.
The goal is to make it easy for employees to find the relevant self-service applications without searching manually.
Important Notes
Always replace ###### with the last 6 digits of your group number.
Use the exact values listed in the task.
The section title must be exactly:
Self-Services
The two tiles must be:
Manage My Timesheet
Concur Travel Expense
Save after editing the page.
Prerequisites
Before doing this task, the following should already exist:
custom business role:
Z_EMPLOYEES_ALL_######
assigned business catalogs:
SAP_HCM_BC_EMP_PC
SAP_CON_BC_CTE_ESS_PC
custom launchpad space and page created for the role
page title and description:
General
Detailed Step-by-Step Procedure
Step 1: Open the app "Maintain Business Roles"
From the SAP S/4HANA Cloud launchpad:
Log in to SAP S/4HANA Cloud.
Search for:
Maintain Business Roles
Open the app.
Explanation:
This is the app where the custom all-employee role is maintained. The launchpad space assignment and page navigation are controlled from here.
Step 2: Open the custom all-employee business role
In Maintain Business Roles:
Search for your custom business role:
Z_EMPLOYEES_ALL_######
Open the role.
Example
If your suffix is 000013, the role is:
Z_EMPLOYEES_ALL_000013
Explanation:
You must work in the custom all-employee role because the launchpad space and page belong to this role.
Step 3: Open the Launchpad Spaces tab
Inside the role:
Click:
Launchpad Spaces
Explanation:
This tab shows which launchpad space is assigned to the role.
Step 4: Verify the Launchpad Space is assigned
Check that the assigned space exists.
In your execution, the assigned space followed this pattern:
Z_ALL_EMP_######
Explanation:
The task says to assign the launchpad space to the custom business role.
If the space already appears in the assigned list, then this part is already complete.
If the space is not listed:
Click Add
Create or assign the required custom space
Save the role
Step 5: Open the assigned Launchpad Space
In the assigned launchpad spaces list:
Click the arrow > at the far right of the space row.
Explanation:
This opens Space Details, where the page linked to the space can be accessed.
Step 6: Open the Pages tab
In Space Details:
Click:
Pages
Explanation:
A space can contain one or more pages.
This task requires you to edit the page content.
Step 7: Open the Launchpad Page
In the Pages list:
Open the page row by clicking the arrow > at the far right.
In your run, the page followed this pattern:
Z_ALL_EMP_######
Explanation:
This opens Page Details, where the page content can be edited.
Step 8: Open Page Content
Inside Page Details:
Click the tab:
Page Content
Explanation:
This is the area where sections and application tiles are maintained.
Step 9: Click Edit
On the Page Content screen:
Click Edit
Explanation:
The page must be in edit mode before you can create sections or add app tiles.
Step 10: Enter the section title
In the section title field, enter exactly:
Self-Services
Explanation:
This creates the section in which the required employee self-service app tiles will be placed.
The title must match the task exactly.
Step 11: Add the tile "Concur Travel Expense"
On the right side of the page content screen, in the list of apps derived from the assigned catalogs:
Find:
Concur Travel Expense
Click:
Add
Explanation:
This adds the Concur employee self-service app tile into the Self-Services section.
Step 12: Add the tile "Manage My Timesheet"
Still on the right side app list:
Find:
Manage My Timesheet
Click:
Add
Explanation:
This adds the timesheet app tile into the same Self-Services section.
Step 13: Verify both tiles are visible in the section
After adding both apps, confirm that the page content now shows:
Concur Travel Expense
Manage My Timesheet
under the section:
Self-Services
Explanation:
This confirms the tiles were placed correctly on the page.
Step 14: Save the page
Click:
Save
Explanation:
This finalizes the page changes.
If you do not save, the tiles and section will not be retained.
Step 15: Verify the role is assigned to your business user
To verify the page and tiles from the home screen, make sure the custom all-employee role is assigned to your own business user.
Open:
Maintain Business Users
Then:
Open your own user
Open Assigned Business Roles
Confirm the role is assigned:
Z_EMPLOYEES_ALL_######
Save if needed
Explanation:
Without role assignment, the launchpad space and page may not appear on the homepage for your user.
Step 16: Refresh the homepage
Go back to Home.
Then:
Refresh the browser or reload the session
Open the page/tab:
General
Explanation:
This ensures the launchpad updates and shows the newly added content.
Step 17: Verify the result on the homepage
On the General page, verify that you can see:
section title:
Self-Services
tile:
Concur Travel Expense
tile:
Manage My Timesheet
Explanation:
This is the final proof that the task was completed successfully.
Expected Result
After this task is completed successfully:
the custom launchpad space is assigned to the business role,
the page contains a section named Self-Services,
the page shows the tiles:
Concur Travel Expense
Manage My Timesheet
the tiles are visible on the launchpad homepage under the General page.
質問 # 23
......
「学ぶのに遅すぎることはありません」、C_S4CPB_2602認定の準備が一般的になりつつあります。特に今日の職場では、さまざまなトレーニング資料やツールが常に混乱を招き、品質をテストする時間を無駄にしています。実際、当社のC_S4CPB_2602テスト問題を完全に信じて、C_S4CPB_2602試験に合格することを100%保証します。 C_S4CPB_2602のテスト問題を使用した後、残念ながら試験に不合格になった場合、証明証明書により当社から全額返金されます。
C_S4CPB_2602日本語版参考書: https://www.topexam.jp/C_S4CPB_2602_shiken.html
C_S4CPB_2602準備の質問を選択すると、プロフェッショナルサービスにより、最適な方法でそれを使用し、それを最大限に活用し、最高の学習結果をもたらすことができます、SAP C_S4CPB_2602出題内容 今、心配をやめてください、したがって、当社のC_S4CPB_2602学習ガイドは、夢を実現するための献身的な支援を提供します、C_S4CPB_2602学習ガイドの資料は、常に卓越性と同義語です、これは高効率の時代であり、SAPおそらくC_S4CPB_2602証明書を通じてのみ競争力を証明する方法が最も簡単です、あなたは最近C_S4CPB_2602テストの準備をしていますか、SAP C_S4CPB_2602出題内容 「もうすぐ試験の時間なのに、まだ試験に合格する自信を持っていないですが、どうしたらいいでしょうか。
んっ♡トオル様、おっぱい弄られんの好きやろ、男つてものは新色が出來ると其の當座は誰しも夢中になつて逆上のぼせるものだとさ、C_S4CPB_2602準備の質問を選択すると、プロフェッショナルサービスにより、最適な方法でそれを使用し、それを最大限に活用し、最高の学習結果をもたらすことができます。
ハイパスレートのC_S4CPB_2602出題内容 & 合格スムーズC_S4CPB_2602日本語版参考書 | 認定するC_S4CPB_2602関連資格知識
今、心配をやめてください、したがって、当社のC_S4CPB_2602学習ガイドは、夢を実現するための献身的な支援を提供します、C_S4CPB_2602学習ガイドの資料は、常に卓越性と同義語です、これは高効率の時代であり、SAPおそらくC_S4CPB_2602証明書を通じてのみ競争力を証明する方法が最も簡単です。
- 真実的なSAP C_S4CPB_2602出題内容 - 合格スムーズC_S4CPB_2602日本語版参考書 | 一生懸命にC_S4CPB_2602関連資格知識 ???? ▶ www.copyright.jp ◀の無料ダウンロード✔ C_S4CPB_2602 ️✔️ページが開きますC_S4CPB_2602日本語版サンプル
- C_S4CPB_2602資格専門知識 ???? C_S4CPB_2602試験対策 ???? C_S4CPB_2602復習攻略問題 ???? 「 www.goshiken.com 」で“ C_S4CPB_2602 ”を検索して、無料でダウンロードしてくださいC_S4CPB_2602無料模擬試験
- 便利なC_S4CPB_2602出題内容 - 合格スムーズC_S4CPB_2602日本語版参考書 | 一番優秀なC_S4CPB_2602関連資格知識 ???? 【 C_S4CPB_2602 】を無料でダウンロード➽ jp.fast2test.com ????で検索するだけC_S4CPB_2602日本語版復習資料
- C_S4CPB_2602資格受験料 ???? C_S4CPB_2602日本語版復習資料 ???? C_S4CPB_2602受験記 ???? ▶ www.goshiken.com ◀を開いて▶ C_S4CPB_2602 ◀を検索し、試験資料を無料でダウンロードしてくださいC_S4CPB_2602資格準備
- 検証するC_S4CPB_2602出題内容一回合格-権威のあるC_S4CPB_2602日本語版参考書 ???? ▛ www.xhs1991.com ▟にて限定無料の▛ C_S4CPB_2602 ▟問題集をダウンロードせよC_S4CPB_2602復習攻略問題
- C_S4CPB_2602日本語学習内容 ???? C_S4CPB_2602試験対策 ???? C_S4CPB_2602資格受験料 ???? 「 www.goshiken.com 」は、[ C_S4CPB_2602 ]を無料でダウンロードするのに最適なサイトですC_S4CPB_2602日本語版サンプル
- C_S4CPB_2602資格勉強 ???? C_S4CPB_2602関連試験 ⛑ C_S4CPB_2602資格受験料 ???? ▛ www.jpexam.com ▟で▛ C_S4CPB_2602 ▟を検索して、無料で簡単にダウンロードできますC_S4CPB_2602試験問題集
- C_S4CPB_2602資格勉強 ???? C_S4CPB_2602受験記 ???? C_S4CPB_2602最新問題 ???? ➡ www.goshiken.com ️⬅️を開き、✔ C_S4CPB_2602 ️✔️を入力して、無料でダウンロードしてくださいC_S4CPB_2602試験対策
- 最高のSAPのC_S4CPB_2602試験テストソフトウェア ???? ✔ www.xhs1991.com ️✔️にて限定無料の▶ C_S4CPB_2602 ◀問題集をダウンロードせよC_S4CPB_2602資格準備
- C_S4CPB_2602日本語参考 ???? C_S4CPB_2602日本語学習内容 ???? C_S4CPB_2602日本語版受験参考書 ???? 今すぐ“ www.goshiken.com ”で[ C_S4CPB_2602 ]を検索して、無料でダウンロードしてくださいC_S4CPB_2602日本語学習内容
- 検証するC_S4CPB_2602出題内容一回合格-権威のあるC_S4CPB_2602日本語版参考書 ???? ➤ www.jpexam.com ⮘の無料ダウンロード➠ C_S4CPB_2602 ????ページが開きますC_S4CPB_2602関連試験
- sidneydond101086.lotrlegendswiki.com, socialdosa.com, www.stes.tyc.edu.tw, geilebookmarks.com, www.stes.tyc.edu.tw, asiyaokik882242.nizarblog.com, anitauivj298923.blogsvirals.com, adrianacfwd554431.wikifiltraciones.com, tiffanykctt670202.tokka-blog.com, dianedvwq253378.newsbloger.com, Disposable vapes